Sunday, August 29, 2010

Special coupon!

I've been so thrilled to see the positive responses to my little tutorials! I'm still making my way through the comments, so if you left a link I'll be visiting you soon if I haven't already. :)

I came across a lovely little skirt using my tutorial in the Moda Bake Shop Flickr group!

Botany skirt

Why don't you click over and leave maggistitches a nice comment! :)

It's been such fun to see the other blogs that have featured my skirt tutorial! One of those is Crafty Girls Workshop and they are even offering a special coupon to my readers to get 10% off your entire purchase from their shop with the code FQ10 . I've never purchased from this shop before, but I sure think it's nice of them to offer a coupon. :) You could use this discount to pick up an Origins jelly roll for yourself to make the same skirt I made or try a new version that is all your own!

Wednesday, August 18, 2010

My Moda Bake Shop debut & an applique pattern to share!

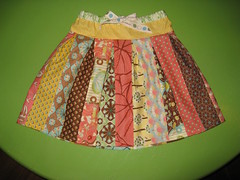
If you've been reading along for a while you may remember this little skirt and my promise to one day share the pattern. Well, that day is here!

I am so excited to share with you my Moda Bake Shop debut! Head over and take a look at my Strip-pieced Pleated Skirt tutorial! The tutorial was so long I decided not to focus on the coordinating t-shirt there, so that's a treat for you right here. :)


If you want to follow along and make a coordinating shirt, you'll need a t-shirt, fabric scraps, paper-backed fusible web, some sort of stabilizer (ideally water soluble), and coordinating thread.

The yellow t-shirt happened to be hanging in the closet - how perfect is that?  I knew I wanted to do an applique of some sort and when I sat down with the skirt and my drawing pad, this is what I came up with. (Scanned and rotated so it looked more balanced.) I wanted to mimic the flowers on a piece of fabric but also didn't want to exactly copy them. I'd planned a simple design, but I think my digiscrap side fought its way through and I ended up with a floral cluster!


I scanned my sketch in not just to show you all, but to create the pattern I used to cut out all the pieces. Here it is after a visit to Photoshop.
The next step is to choose the fabrics for each piece! I used the same Basic Grey Origins Jelly Roll as I did for the skirt, some of the same fabrics, and some other strips I hadn't used yet. I roughly cut out the paper pattern piece, then cut a small piece of fabric I could fit the pattern on, and attached paper backed fusible web to the wrong side of the fabric. Instead of tracing the pattern onto the paper backing I just held the pattern right on top and cut it out right along with the fabric!


After cutting, then place each little applique piece on to the fabric to lay out the final arrangement.


As you can see I didn't end up following my own pattern! Instead of layering the big flower's center I fussy cut it (same for the smaller flowers too). Also with the way I placed the pieces it still seemed a bit unbalanced, so I added in an extra leaf on the right.  Once you are happy with the placement, fuse in place according to the directions on your fusible web.

After fusing, it's time to sew! I've hand embroidered along the edges of fused appliques before, but I wanted something quicker for this project, so I used a 30 weight Sulky machine embroidery thread and a machine buttonhole stitch! Use a stabilizer on the underside to keep your stitches nice and smooth. A water soluble stabilizer would be ideal but I didn't have any and didn't feel like waiting, so I just forged ahead and used another sheet of graph paper. :) Worked nicely for keeping the fabric from getting pulled down into the feeddogs and kept the stitches even, but was a giant pain to remove at the end. Looked neat though!


For a nice clean finish, leave the beginning and ending thread tails an inch or two long, pull to the inside, and then knot and trim them. This will also help prevent the thread from coming undone.

I haven't yet, but I plan to fuse a lightweight knit interfacing inside the shirt to cover up the stitches and give it a softer feel.

Here's the finished shirt!


And if you'd like to use my little applique pattern, you can download it right HERE. Please note, this pattern is for personal use only, not for any commercial use including home-sewing for profit. (It would look really cute on a tote bag or a backpack too I think!)

If you do use it, I'd love to see your final result! Post a comment with a link to your photo or send me an email!
Friday, August 13, 2010

Oliver + S Music Class pattern

Did you see? I reviewed another pattern on Above All Fabric's blog yesterday!

I really do love the Oliver + S Music Class pattern! The shirt and skirt are both so versitile!


The year after next both of my girls will likely wear a school uniform every day, and I thought to myself as I was sewing this outfit that this pattern would also work beautifully for that! In the Oliver + S flickr group I saw someone else doing just that!

Click on over to Above All Fabric's blog to see the sweet details on the skirt and shirt!

Monday, August 9, 2010

Oliver + S Sketchbook pattern!

Hop on over to the Above All Fabric blog and see my review of the Oliver + S Sketchbook Shirt and Shorts pattern!


This time around I used Amy Schimler’s Lions by Robert Kaufman for the shirt and camel corduroy for the shorts. I keep finding more and more fabrics that I want to make more shirts and shorts for my little guy with! This is a pattern that is definitely easy to dress up or dress down.

A little catching up!

I was so excited to learn I'd won the public vote in the Project Quilting Office Supply challenge! And in even more excitement I placed 2nd in the judges vote! WOW! I really do love how my little quilt turned out. It was worth those two almost sleepless nights I think!


I have been busily sewing the last few weeks, finishing more projects in a week that I think I every have before! BUT I can't show them all to you just yet. I will soon! I sewed up a few adorable samples that will be featured on the Above All Fabric blog this week, I sewed up a sample for a fun pattern Trish of Two Peas In A Pod Homegrown Designs will publish soon, and I'm working on my very first fully detailed sewing tutorial to be featured on a very exciting website later this month. (Super exciting!) And that's doesn't even cover everything!

And one more exciting bit of news, the MODKID Kyoko dress I sewed last Fall was featured in the Basic Grey August 2010 newsletter!  If you aren't subscribed to recieve them by email, you can download the newsletter pdf right on this page of the Basic Grey website.  Take a peek!

Sunday, August 8, 2010

MODKID Abigail with Patty Young Knits!

I should have shared this photos here ages ago! I sewed up two MODKID Abigail dresses earlier this summer with the pattern and some of the fabric the giveaway on The Creative Connection blog! I also purchased a bit more knit fabric to add some pink details.

Sewing with the knit fabric wasn't hard at all! I used a ballpoint needle and ballpoint pins, and my regular thread. For the interior seams I used a stretch overcast stitch and straight stretch stitch for the topstitching.

My 4-year-old in particular adores her dress! I made her a size 5 and it's a bit big, but that doesn't stop her from wanting to wear it day after day. It's her "soft" dress.


I made a similar dress with a different colorway of the mod dot for my 6-year-old. They really were quick to sew and turned out so cute!

I'll be sewing with this pattern again soon. I bought some more knit fabric in the cute Carnival Bloom design especially to make a long sleeved Abigail for when it cools down.