There's a fun contest going on at Quokka's Quilts right now and I couldn't resist joining in! Fat Quarter Shop has specially selected fat quarter bundles that have been chosen by various designers and bloggers. The winner of this contest will get a bundle up for sale at Fat Quarter Shop this year AND wins 1/2 yard of each of the fabrics included in the bundle they created!
As the base of my blogger's choice bundle I had to choose some prints from the new Urban Cowgirl collection by Urban Chiks - I just have to get my hands on it! And once I started looking around, I found that Butterscotch & Roses by Fig Tree Quilts and Curio by Basic Grey also coordinate beautifully! I love the browns in Blueberry Crumb Cake by Blackbird Designs too!
From left to right, top to bottom:
1. Blueberry Crumb Cake Cake Bouquet - Blackbird Designs
2. Urban Cowgirl Turquoise Bandana - Urban Chiks
3. Urban Cowgirl Turquoise Pony Ride - Urban Chiks
4. Urban Cowgirl Pond Cowboy Shirt - Urban Chiks
5. Urban Cowgirl Mud Jolie Yardage - Urban Chiks
6. Curio Asparagus Camellia Yardage - Basic Grey
7. Curio Butternut Victoria Yardage - Basic Grey
8. Butterscotch & Roses Fresh Tarragon Acorn Mosaic - Fig Tree Quilts
9. Urban Cowgirl Rose Cowboy Shirt - Urban Chiks
10. Butterscotch & Roses Frosting Rose Queen Anne's Lace - Fig Tree Quilts
11. Urban Cowgirl Mud Lace - Urban Chiks
12. Urban Cowgirl Cotton Lucky - Urban Chiks
13. Bella Solids Willow (#119)
14. Bella Solids Stone (#128)
15. Bella Solids Together Tan (#179)
Showing posts with label contest. Show all posts
Monday, January 2, 2012
Thursday, March 24, 2011
Moda Bake Shop contest, an exciting magazine back cover & a sneak peek!
Have you heard about the Moda Bake Shop contest for March? Head over to the Contest page and download the Printer Friendly Version to read all the details!

Charm packs might be my very favorite precut! They are so inexpensive and you get a taste of the whole fabric line! Plus, there's a lot you can do with a 5" square!
Remember my Log Cabin Baby Block Recipe? You can make one with Charm Pack (and have some left over)!
![]()
If you've picked up the Perfect for Precuts magazine that's on newstands right now, be sure you flip it over and take a look at the back cover!
What's that in the top left corner? :) Lots of other great MBS projects and friendly faces too!
I'm currently putting up finishing touches an on new Moda Bake Shop recipe that will also feature Charm Packs! I won't show you the whole thing, but here's a little sneak peek.
You can also search Moda Bake Shop for all recipes featuring Charm Packs!

Charm packs might be my very favorite precut! They are so inexpensive and you get a taste of the whole fabric line! Plus, there's a lot you can do with a 5" square!
Remember my Log Cabin Baby Block Recipe? You can make one with Charm Pack (and have some left over)!
If you've picked up the Perfect for Precuts magazine that's on newstands right now, be sure you flip it over and take a look at the back cover!
What's that in the top left corner? :) Lots of other great MBS projects and friendly faces too!
I'm currently putting up finishing touches an on new Moda Bake Shop recipe that will also feature Charm Packs! I won't show you the whole thing, but here's a little sneak peek.
You can also search Moda Bake Shop for all recipes featuring Charm Packs!
Tuesday, March 15, 2011
Project Quilting: Flying Geese Challenge & a wild Nature Walk Pullover
I just couldn't miss out on this week's Project Quilting challenge! I knew exactly what I wanted to do when I read the challenge combining the traditional flying geese block and complimentary colors! It immediately made me think of geese flying in the sky at sunset!
This piece measures approximately 17" x 9 1/2". I used foundation piecing (geese), traditional piecing (sky) and fusible applique (for the lower landscape).
I alway try something new for each Project Quilting Challenge! This was my first time using batiks or a true black. Even though I knew just what I wanted to do as soon as I read the challenge, time got away from me, so this also became the first time I think I've ever completed a full project in less than 24 hours, as I finally started sketching this one after noon Central Saturday (yesterday) and we lost an hour to daylight savings overnight.
If you like it, I'd really love your VOTE! Be sure to take a look at all the great entries and comment to enter the public drawing too! (I'm Sarah B.)
The week before last I whipped up this special shirt for my little guy. He picked out the fabrics himself! They are Riley Blake All Star 2 and the pattern is the Oliver + S Nature Walk Pullover.
(Take a peek at the mock up I did months ago of it in Photoshop!)
Monday, February 14, 2011
Project Quilting - Be My Valentine challenge
The 3rd challenge of Project Quilting season 2 was posted last week and I really wanted to join in! (Voting is up now!)
I came up with a plan pretty early but the week started with a sick kiddo, then came a snowstorm, then migraines…. I finally cut fabric on Thursday and got out to pick up a frame on Friday! Originally I'd had a 10" tall 20" wide frame in mind, but just couldn't find one! So it turned out to be for the best the I waited to start sewing until I found the frame. This frame is 11" x 14".
All the fabrics used for patchwork are either from the kids' baby quilts or from my latest quilt that I made for my husband and I, so it's neat to pick each little piece out and see where it came from!
The hearts were crazy pieced then raw-edged appliquéd on to the pieced background.
In this close up if you squint you can almost see the free-motion quilted loops and hearts on the background.
As I did last season in Project Quilting, I gave myself an additional challenge for each one I completed to try something new! This is the first quilt I've completed with raw edge appliqué and the first quilt I've placed in a frame.
Head on over to Kim's Crafty Apple and see all this week's other Project Quilting entries! Be sure to vote for your favorite!
Monday, November 15, 2010
My Above All Fabric Wish List
Melanie of Above All Fabric is holding a fun little contest! Her site has a handy wishlist feature and three lucky winners are going to win gift certificates just for blogging about what's on saved on their wishlist!
Here's just a bit of mine!
I finally got some voile, the last bit of Melanie's Coloring Garden, also in Dusk, and it has such a nice texture!
It's no secret I love Oliver + S patterns! I'd really love the pick up the latest, especially the Hopscotch Skirt & Knit Top and the Nature Walk Pullover & Knit Pants!
For the Nature Walk Pullover I've been eyeing the super-cute Riley Blake All Star 2 line! Here's a little mock-up I've made using a photo from the Oliver+S website and fabric photos from Above All Fabrics - add the magic of Photoshop and....
That's Mini Star - Orange on top and Bullseye Star - Orange on the bottom.
Also on my wishlist, the adorable Oliver + S Ice Cream Dress!
I think it would be so cute for Spring in Jenean Morrison's Picnic Parade Mingle in Pink!
And with that I'll end my wishlist post. I do still have more on my wishlist, and even more I've been admiring but haven't added on yet, but I can't post it all! :)
Here's just a bit of mine!
It's no secret I love Oliver + S patterns! I'd really love the pick up the latest, especially the Hopscotch Skirt & Knit Top and the Nature Walk Pullover & Knit Pants!
For the Nature Walk Pullover I've been eyeing the super-cute Riley Blake All Star 2 line! Here's a little mock-up I've made using a photo from the Oliver+S website and fabric photos from Above All Fabrics - add the magic of Photoshop and....
That's Mini Star - Orange on top and Bullseye Star - Orange on the bottom.
Also on my wishlist, the adorable Oliver + S Ice Cream Dress!
I think it would be so cute for Spring in Jenean Morrison's Picnic Parade Mingle in Pink!
And with that I'll end my wishlist post. I do still have more on my wishlist, and even more I've been admiring but haven't added on yet, but I can't post it all! :)
Monday, September 20, 2010
Two finished Jump Rope Dresses & more fun!
The Sew-Mama-Sew Jump Rope Dress sew-along was so much fun! I finished a day or two late, but now my girlies each have a new dress!
I haven't gotten a perfect picture of the view A dress yet, but here's a peek. It really turned out so cute! The woven plaid is thin and so soft! I made the long sleeves but added a tab with a buttonhole inside the sleeve and a button on the outside at short-sleeve length so that the sleeves can be rolled up. This works well with the thin fabric but wouldn't with anything much thicker.
I really like how view B turned out as well!
Today I spent a little time working on a new tutorial for Moda Bake Shop! It's turning out really cute - I can't wait to share it with you all!
I read about fun contest I may try and join in on! Purse Week at Lemon Squeezy Home! I'm going to do a bit of thinking and see if I come up with something to try!
Sunday, July 25, 2010
Project Quilting - Office Supply Challenge
I told myself I wouldn't try and do the new Project Quilting challenge - just too many things that needed to be done this past week! But I read about the current challenge last Sunday and tried not to think about it too much. By Monday I had the project that I ended up doing firmly planted in my mind and I just couldn't ignore it! I just knew I had to make a quilt with this little sketch/doodle whether or not I made it in time to submit it to Project Quilting. When I was in school I always used to draw in the margins of my notebooks as I sat in class. If I just had regular lined paper I would lightly draw in vertical lines too, then draw the framework you can see on the right side of the scan below, then shade in with pen or pencil.
The challenge was to choose at least 3 office supplies and either use them in your project or let them be the inspiration. I chose 2 obvious ones from the sketch above - graph paper and colored pencils. For my 3rd item I chose another favorite - binder clips! I just knew they'd be perfect for hanging up a small piece on the wall!
I finally got started on Wednesday. Using some white Kona cotton, my big ruler and a fabric marking pencil I drew little dots every 1/2" all over the fabric. I was planning for those little dots to be my guide when sewing out the graph paper grid. Once I got all done and sat down at the sewing machine I realized that was just not going to work. With a 2 year old climbing all over you as you are drawing out dots, accuracy drops. I ended up ignoring the dots I spent an hour drawing and just sewing using the presser foot as a guide. The dotty side became the back. :) This photo was taken Tuesday night.
The next step was to sketch/sew on the doodle! For this step I used a light grey thread. I wish I'd used a darker grey but no time to stop sewing and go to the store for darker thread. And here is what the quilt looked like with the doodle outline all sewn. (Taken Thursday night.) I doubled the size of the doodle on the grid too so it would be easier to see.
The grid and the outlining went pretty quickly. I had visions of uploading photos of my little quilt Friday evening, Saturday morning at the latest. WRONG!
To fill in all the outlines to mimic the shading I usually draw I decided I'd use colored thread and fill it in by straight stitching back and forth; close together for the darker shading and a bit farther apart for the lighter shade. I thought this would take a couple hours at most. So very wrong! I think it actually took about 10, mostly hours where I should have been sleeping! I worked from about 10pm - 2:30am the past two nights (but did the binding in there too) plus I got up early this morning to finish up. I'm exhausted but with the last two nights I was not about to miss today's submission deadline!
This is where I gave up Friday night.
I had all but the bright yellow and yellow-green done when I stopped last night (or dark-thirty this morning technically) but didn't think to take a photo.
I had originally planned an in-order rainbow arrangement, but since I didn't have a real orange I decided to shift everything a bit. Plus I'd rather have the focus be on the blues and greens.
It was such a relief this morning to get those final stitches in! And somehow I managed to finish just before I used up the 2nd full bobbin on grey thread! I used all grey in the bobbin for the outlining and coloring, so the back looks like I just colored it in with a regular pencil. (If you ignore all those loose threads I haven't taken care of yet.)
Here's the final finished quilt! I really do like how it turned out and I think the binder clip hangers are an extra fun touch. :) I'll either paint those thumbtacks to match the wall or use something else to hang the clips.
And here's another close look! This time, from the side.
I hope you like my little quilt too! I'd love to have your vote this week over at Project Quilting! Vote on the upper left side and be sure to leave a comment on the Office Store Challenge post to have a chance at winning a prize too!
Sunday, July 11, 2010
Stars for Project Quilting!
I jumped in for another round of challenge fun at Project Quilting! The theme posted last Sunday was "Stars Over America" and (as I understood it) required the use of one color and as an option you could also add red, white and/or blue.
Here is the version of little mini quilt wall hanging as I submitted it to the challenge! It's named "Twinkle, Twinkle," after the kid's song. :)
I say "as I submitted" because I still intend to add one more element, but absolutely ran out of time! (I was doing the last bit of machine quilting just 5 minutes before the noon CST deadline today, so I hurriedly took a photo with my phone's camera and uploaded it to Flickr, then ran over to my computer to add it to the Project Quilting group. I'm still not sure if I managed to sneak in under the deadline. I hope so!
After my speed quilting this morning, I'm taking a little breather, but I intend to add on 5 little stuffed stars hanging from the bottom on the same blue yarn I used along the edge of the mini quilt. THEN it will go into my little guy's room. :) I'll be sure to share a final picture of it!
I chose all the fabric from the stack I still had sitting out! All but 1 piece of fabric here was also featured in the Windy Days quilt I have up for vote in the McCalls Quilt Design Star contest! (Are you voting every day still? RIGHT HERE! Thank you!) Can you pick out which is the new addition? :) (Hint -- it's not a blue!)
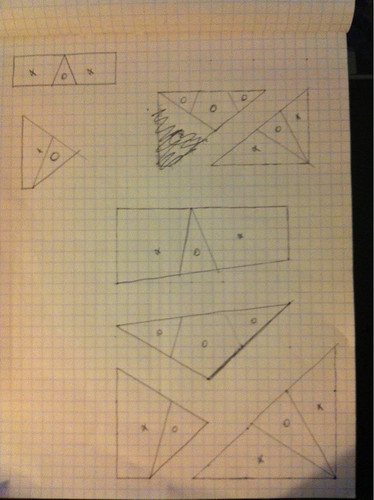
When I read the theme "Stars Over America" I knew I wanted to do some foundation pieced stars. I wanted to do stars years ago but then got distracted with other projects and never started, so this was my change! I decided to make this even more of a challenge for me and NOT let things be symmetrical and carefully measured. I drew the stars freehand on graph paper and then created foundation patterns based on those sketches. Here is a peek at a few of the star patterns. (I don't draw on the seam allowance, I just remember to leave excess all around the edges of each piece.)
Each of the 7 stars is a little different! Here is a peek at all the finished stars before I tore all the paper off.
And here is the front view of all the finished stars! I grouped the 2 smallest stars together in one block and then "crazy-pieced" the stars into rectangles. (Late night photo w/ flash turned my tans bright yellow!)
I was inspired to use yarn along the edge of my project by Love Bug Studio's log cabin entry (she used a fuzzy fiber along the pin edges). My 1st chance to make it out to a shop to find some yarn was last night, about 15 minutes before the store closed! I couldn't find the perfect shade but then I remembered Kathleen of Kathleen Quilts mentioned tea dying one of her fabrics for this challenge, so even though I'd never done it before, I thought I'd give it a try! I left a long length of yarn in hot concentrated tea for about an hour and then dried it with towels and then a hot dry iron since I was in a rush to sew it on! (Another horrible late night, kitchen-lighting-photo of the yarn I bought and the tea-dyed yarn, but the difference is still clear!) Thanks for the inspiration ladies!
The last thing left to do this morning before the noon CST deadline was the machine quilting! I went freeform with this as well, another 1st! My only plan when I sat down at the sewing machine was to echo the stars and use a bluish-grey thread for quilting the blue fabrics and a light tan thread for quilting the stars. I ended up machine quilting lines approximately 1/4" apart, echoing the stars and using mostly parallel-to-the-edge quilting in the thin border. I underestimated how long it would take to quilt (just over an hour) and finished the last bit just 5 minutes before the deadline!
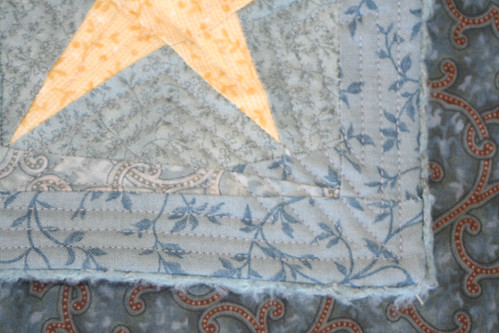
Here's a closeup of the bottom right corner so you can see the echo quilting and the couched fiber a bit better. (Ahhh ... natural light, so much better!)
And on the back you can clearly see the different color thread for the stars.
Be sure to head over to Project Quilting and see all the amazing quilts created last week! Vote for your favorite on the left sidebar and then see how to enter into the public contest too!
Thursday, July 8, 2010
Some Contest Results!
A big thank you to everyone who has put in their votes for me this week!
I was thrilled to win the public vote for my little log cabin cube over at Project Quilting!
And speaking of Project Quilting, I started sewing on my project for the current challenge, "Stars Over America," today! I'm using a foundation piecing pattern that I dreamed up years ago but never used and I love how it's turning out! Stay tuned for a process post of how I made it soon. :)
Sadly I didn't win the cheater quilt contest at Spoonflower, but I am pleased with the little quilt I designed and intend to order the panel for myself sometime!
And lastly, what you've been waiting for, the results of my own little contest! I promised I would give away some sort of prize even if I didn't win, so the winner will get her choice of a $10 coupon to go shopping for digital scrapbooking supplies at my Digitals store OR a custom fat quarter of her choice from my designs at Spoonflower! The winner is...
Congratulations Aubrey! I'll be emailing you shortly to find out your pick! :)
Also, a little reminder! I would really, really, really love to make it to the finalist round! They are taking public votes all month long and while the judges will pick the 15 finalists, lots of public votes (and comments!) would certainly get their attention. :) You can vote HERE daily!
Thursday, July 1, 2010
The week & month of contests!
Remember the post from a couple weeks ago about the quilt that cost me the edge of my fingertip? Well, injured finger or not, I was determined to get that little quilt done so I could enter it into McCall's Quilt Design Star contest! Here's the finished quilt!
I would really, really, really love to make it to the finalist round! They are taking public votes all month long and while the judges will pick the 15 finalists, lots of public votes would certainly get their attention. :) You can vote HERE daily!
Here is a close up of the same quilt. I've named it Windy Day Pinwheels and it will hang in my son's room. It uses many of the same fabrics as my girls' quilts!
I've collected so many fabrics for his quilt over his two years that I made it really scrappy, but here's a peek at my color placement sketch so you can see the pinwheel pattern a little better.
That's not the only fabric/quilt/contest news! I also created a “cheater quilt” panel with my "I *Heart* Daisies" designs for the current Spoonflower Fabric of the Week contest! I’d sure love to win and if I do, I’ll have a little giveaway! See the details below. (A cheater quilt is a panel of printed fabric that looks as if it was pieced with different fabrics.)
The quilt with the most votes will be announced on July 7th and if it’s mine, I’ll let random.org do some picking for me and choose one winner from this blog and one from my sewing blog! You are free to enter both and you have until the end of the day, July 6th ET to do it. :) The winner from each can choose between a $20 coupon to my Digitals store or 1 yard of your choice of fabric (on quilting cotton) from my Spoonflower store or any fabric based on a patterned paper in any of my digital scrapbook kits!
Here is how you can enter and get your name in a few times!
That’s it! Thanks for helping me out! :)
Also, remember to vote for me (Sarah B) or whoever your favorite entry is over at Project Quilting by Saturday!
(If I don't win at Spoonflower, I'll still have a little giveaway of some sort. :) I just haven't figured out what yet!)
I would really, really, really love to make it to the finalist round! They are taking public votes all month long and while the judges will pick the 15 finalists, lots of public votes would certainly get their attention. :) You can vote HERE daily!
Here is a close up of the same quilt. I've named it Windy Day Pinwheels and it will hang in my son's room. It uses many of the same fabrics as my girls' quilts!
I've collected so many fabrics for his quilt over his two years that I made it really scrappy, but here's a peek at my color placement sketch so you can see the pinwheel pattern a little better.
That's not the only fabric/quilt/contest news! I also created a “cheater quilt” panel with my "I *Heart* Daisies" designs for the current Spoonflower Fabric of the Week contest! I’d sure love to win and if I do, I’ll have a little giveaway! See the details below. (A cheater quilt is a panel of printed fabric that looks as if it was pieced with different fabrics.)
The quilt with the most votes will be announced on July 7th and if it’s mine, I’ll let random.org do some picking for me and choose one winner from this blog and one from my sewing blog! You are free to enter both and you have until the end of the day, July 6th ET to do it. :) The winner from each can choose between a $20 coupon to my Digitals store or 1 yard of your choice of fabric (on quilting cotton) from my Spoonflower store or any fabric based on a patterned paper in any of my digital scrapbook kits!
Here is how you can enter and get your name in a few times!
- Post a comment below letting me know you voted!
- Become a follower of this blog and leave a separate comment letting me know you did (or if you already are).
- Tweet a link to this blog post and leave a separate comment with a link to your tweet!
That’s it! Thanks for helping me out! :)
Also, remember to vote for me (Sarah B) or whoever your favorite entry is over at Project Quilting by Saturday!
(If I don't win at Spoonflower, I'll still have a little giveaway of some sort. :) I just haven't figured out what yet!)
Sunday, June 27, 2010
My first venture into Project Quilting!
I heard about Project Quilting a while back before it started, but didn't have time to join in the 1st challenge and somehow forgot all about it until last week! When I saw the 4th challenge posted last Sunday, I just couldn't get it out of my head, so when I came up with this idea, I knew it was time to jump in!
The theme for Challenge 4 was the log cabin block and the challenge was that the back of at least one fabric had to be included. (See the challenge post for all the rules.) The motto for Project Quilting is "Think outside the square," so that in combination with the log cabin block made me think about an actual block, a cube!
I went hunting in my stash for fabric that I not only loved the right side of, but the wrong side to. When I saw the Moda charm pack of the Basic Grey Eva line I knew that was it! To start, I separated the charm squares out into 6 groups, one for each side. I initially thought I'd use 6 fabrics per side, but ended up using just 5, so I pulled 1 square out of each of these stacks once I started cutting (all the textured solid prints and 1 or 2 patterned prints). See how nice the back of the fabrics are too? Visibly different, but still beautiful!
With only a 5" square of each to work with, I knew the pieced had to be tiny! The center finished to 1" square, and the strips just 1/2".
Here's a little mock up of one of the blocks! I used the right side of the fabric in the center and on the top and left of each little quilt block and the wrong side of the fabric on the right and bottom. I guess I should have put the wrong side on the left and the right on the right, huh? :)
The little blocks all came together really quickly! Here are all 6 unquilted blocks along with the batting and muslin backing for each.
I machine quilted each block in a square spiral pattern. I used a greyish-taupe thread for the 2 dark blocks and white for the 4 lighter blocks.
Assembly time! I made 2 3-block strips. Now picture folding each strip into a C shape and fitting those together --- it makes a block!
With a single seam I sewed the blocks together, leaving the last edge open for turning and stuffing.
And just like that, I went from 6 flat little quilts into a 3-dimensional quilted block!
After turning, stuffing and hand stitching the opening closed, I was done!
I had planned to use this as a pincushion right beside my machine, but I love it so much I don't know if I will! Right now I have it placed where can see it while I'm working!
Be sure to head over to Project Quilting and VOTE for your favorite entry! Of course I'd love to win, but be sure to admire all the amazing entries and pick your favorite! One lucky voter will win a prize too -- vote on the left sidebar and read down through to the end to see how to enter!
Subscribe to:
Posts (Atom)