Sunday, September 12, 2010

Quick blankie, Jump Rope Sew-Along and a fun suprise!

I wanted to share a quick little project I sewed yesterday! A friend's little girl was so sad to outgrow her very favorite dresses so I was happy to turn them into a special keepsake for her. I thought about what would be the best way to do it for a few days, and finally settled on a simple 4-triangle-panel design because I wanted to keep the ruffles all around the edges.

Here's the before:


And here's the after!  (Excuse the cruddy lighting on both - just phone pictures taken in a rush so the blankie would be ready for the little girl's birthday party.)


In other sewing news, I've been having fun with the Jump Rope Sew-Along at Sew Mama Sew! I decided to make 2 dresses, 1 for each of my girls, although I'm sure they'll both wear each since they they both measure the same size for this pattern! I've chosen a woven plaid for view A and the floral print I mentioned previously for view B! Here's a peek at both in progress (turn you head and pretend Blogger is not rotating for no reason).


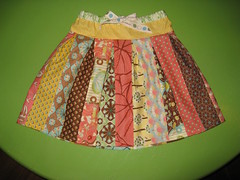
And one last bit of fun - my little Strip-Pieced Pleated Skirt recipe was featured at We All Sew! Take a peek - there's a huge list of free project tutorials and several I'd like to try!

Friday, September 3, 2010

New fabric swatch, a pillowcase & request for fabric selection help!

Remember that little contest I held back in July? Well Aubrey AKA Mauby was the winner and she chose a custom design based on my digital scrapbook paper pack, Rough & Tumble! She actually really liked the way the paper pack preview looked, with the patterned stripes, so that's what I used as the basis of the fabric design! Here's the final product! (You can pick some up for yourself at Spoonflower!)


Making this fabric inspired me to finally round out the paper pack and turn it into a full kit, which you can see more about HERE.

Back in May, when I visited a quilt show my little 4-year-old chose some fabric for a new pillowcase. Somehow that little project kept getting forgotten, but no longer! I cut and partially sewed it a few days ago and finished stitching it up today. It has her seal of approval!


The fabrics are all "Spring Meadow" by Cheri Strole. I have a bit left of the main print, about 1/4 yard. and just a bit of the stripe left. It would make a cute t-shirt applique I think!

Have you heard about the about-to-start Sew-Along at Sew Mama Sew? I decided to join in the fun! I received my Oliver + S Jump Rope Dress pattern in the mail yesterday and I'm trying to decide which fabric to use now. I'm determined to use something from my stash because I have way, way too much stocked up! If I don't use all the yards of fabric I've bought to "someday" make an outfit with for my girls, soon they won't want me to make them anything with it! Right now I'm thinking of using a cute floral off-brand I picked up at Hobby Lobby last year or maybe the year before that. I found a photo of the floral on flickr -- click over and let me know what you think! I wonder if it is too busy -- I don't want all the nice Jump Rope dress details to be hidden. I  have enough of a coordinating multicolor dotted fabric to use it for the whole dress and just use a bit of the floral as an accent, but I don't know that my 6yo would be pleased because it's not super-girly.  Now that I'm writing all this out I'm leaning toward setting this fabric to the side making a run for the fabric store for some nice shirting material or a not-at-all busy print like the pink shown HERE. Tell me what you think!

Sunday, August 29, 2010

Special coupon!

I've been so thrilled to see the positive responses to my little tutorials! I'm still making my way through the comments, so if you left a link I'll be visiting you soon if I haven't already. :)

I came across a lovely little skirt using my tutorial in the Moda Bake Shop Flickr group!

Botany skirt

Why don't you click over and leave maggistitches a nice comment! :)

It's been such fun to see the other blogs that have featured my skirt tutorial! One of those is Crafty Girls Workshop and they are even offering a special coupon to my readers to get 10% off your entire purchase from their shop with the code FQ10 . I've never purchased from this shop before, but I sure think it's nice of them to offer a coupon. :) You could use this discount to pick up an Origins jelly roll for yourself to make the same skirt I made or try a new version that is all your own!

Wednesday, August 18, 2010

My Moda Bake Shop debut & an applique pattern to share!

If you've been reading along for a while you may remember this little skirt and my promise to one day share the pattern. Well, that day is here!

I am so excited to share with you my Moda Bake Shop debut! Head over and take a look at my Strip-pieced Pleated Skirt tutorial! The tutorial was so long I decided not to focus on the coordinating t-shirt there, so that's a treat for you right here. :)


If you want to follow along and make a coordinating shirt, you'll need a t-shirt, fabric scraps, paper-backed fusible web, some sort of stabilizer (ideally water soluble), and coordinating thread.

The yellow t-shirt happened to be hanging in the closet - how perfect is that?  I knew I wanted to do an applique of some sort and when I sat down with the skirt and my drawing pad, this is what I came up with. (Scanned and rotated so it looked more balanced.) I wanted to mimic the flowers on a piece of fabric but also didn't want to exactly copy them. I'd planned a simple design, but I think my digiscrap side fought its way through and I ended up with a floral cluster!


I scanned my sketch in not just to show you all, but to create the pattern I used to cut out all the pieces. Here it is after a visit to Photoshop.
The next step is to choose the fabrics for each piece! I used the same Basic Grey Origins Jelly Roll as I did for the skirt, some of the same fabrics, and some other strips I hadn't used yet. I roughly cut out the paper pattern piece, then cut a small piece of fabric I could fit the pattern on, and attached paper backed fusible web to the wrong side of the fabric. Instead of tracing the pattern onto the paper backing I just held the pattern right on top and cut it out right along with the fabric!


After cutting, then place each little applique piece on to the fabric to lay out the final arrangement.


As you can see I didn't end up following my own pattern! Instead of layering the big flower's center I fussy cut it (same for the smaller flowers too). Also with the way I placed the pieces it still seemed a bit unbalanced, so I added in an extra leaf on the right.  Once you are happy with the placement, fuse in place according to the directions on your fusible web.

After fusing, it's time to sew! I've hand embroidered along the edges of fused appliques before, but I wanted something quicker for this project, so I used a 30 weight Sulky machine embroidery thread and a machine buttonhole stitch! Use a stabilizer on the underside to keep your stitches nice and smooth. A water soluble stabilizer would be ideal but I didn't have any and didn't feel like waiting, so I just forged ahead and used another sheet of graph paper. :) Worked nicely for keeping the fabric from getting pulled down into the feeddogs and kept the stitches even, but was a giant pain to remove at the end. Looked neat though!


For a nice clean finish, leave the beginning and ending thread tails an inch or two long, pull to the inside, and then knot and trim them. This will also help prevent the thread from coming undone.

I haven't yet, but I plan to fuse a lightweight knit interfacing inside the shirt to cover up the stitches and give it a softer feel.

Here's the finished shirt!


And if you'd like to use my little applique pattern, you can download it right HERE. Please note, this pattern is for personal use only, not for any commercial use including home-sewing for profit. (It would look really cute on a tote bag or a backpack too I think!)

If you do use it, I'd love to see your final result! Post a comment with a link to your photo or send me an email!

Friday, August 13, 2010

Oliver + S Music Class pattern

Did you see? I reviewed another pattern on Above All Fabric's blog yesterday!

I really do love the Oliver + S Music Class pattern! The shirt and skirt are both so versitile!


The year after next both of my girls will likely wear a school uniform every day, and I thought to myself as I was sewing this outfit that this pattern would also work beautifully for that! In the Oliver + S flickr group I saw someone else doing just that!

Click on over to Above All Fabric's blog to see the sweet details on the skirt and shirt!

Monday, August 9, 2010

Oliver + S Sketchbook pattern!

Hop on over to the Above All Fabric blog and see my review of the Oliver + S Sketchbook Shirt and Shorts pattern!


This time around I used Amy Schimler’s Lions by Robert Kaufman for the shirt and camel corduroy for the shorts. I keep finding more and more fabrics that I want to make more shirts and shorts for my little guy with! This is a pattern that is definitely easy to dress up or dress down.

A little catching up!

I was so excited to learn I'd won the public vote in the Project Quilting Office Supply challenge! And in even more excitement I placed 2nd in the judges vote! WOW! I really do love how my little quilt turned out. It was worth those two almost sleepless nights I think!


I have been busily sewing the last few weeks, finishing more projects in a week that I think I every have before! BUT I can't show them all to you just yet. I will soon! I sewed up a few adorable samples that will be featured on the Above All Fabric blog this week, I sewed up a sample for a fun pattern Trish of Two Peas In A Pod Homegrown Designs will publish soon, and I'm working on my very first fully detailed sewing tutorial to be featured on a very exciting website later this month. (Super exciting!) And that's doesn't even cover everything!

And one more exciting bit of news, the MODKID Kyoko dress I sewed last Fall was featured in the Basic Grey August 2010 newsletter!  If you aren't subscribed to recieve them by email, you can download the newsletter pdf right on this page of the Basic Grey website.  Take a peek!

Sunday, August 8, 2010

MODKID Abigail with Patty Young Knits!

I should have shared this photos here ages ago! I sewed up two MODKID Abigail dresses earlier this summer with the pattern and some of the fabric the giveaway on The Creative Connection blog! I also purchased a bit more knit fabric to add some pink details.

Sewing with the knit fabric wasn't hard at all! I used a ballpoint needle and ballpoint pins, and my regular thread. For the interior seams I used a stretch overcast stitch and straight stretch stitch for the topstitching.

My 4-year-old in particular adores her dress! I made her a size 5 and it's a bit big, but that doesn't stop her from wanting to wear it day after day. It's her "soft" dress.


I made a similar dress with a different colorway of the mod dot for my 6-year-old. They really were quick to sew and turned out so cute!

I'll be sewing with this pattern again soon. I bought some more knit fabric in the cute Carnival Bloom design especially to make a long sleeved Abigail for when it cools down.

Sunday, July 25, 2010

Project Quilting - Office Supply Challenge

I told myself I wouldn't try and do the new Project Quilting challenge - just too many things that needed to be done this past week! But I read about the current challenge last Sunday and tried not to think about it too much. By Monday I had the project that I ended up doing firmly planted in my mind and I just couldn't ignore it! I just knew I had to make a quilt with this little sketch/doodle whether or not I made it in time to submit it to Project Quilting. When I was in school I always used to draw in the margins of my notebooks as I sat in class.  If I just had regular lined paper I would lightly draw in vertical lines too, then draw the framework you can see on the right side of the scan below, then shade in with pen or pencil.


The challenge was to choose at least 3 office supplies and either use them in your project or let them be the inspiration. I chose 2 obvious ones from the sketch above - graph paper and colored pencils. For my 3rd item I chose another favorite - binder clips! I just knew they'd be perfect for hanging up a small piece on the wall!

I finally got started on Wednesday. Using some white Kona cotton, my big ruler and a fabric marking pencil I drew little dots every 1/2" all over the fabric. I was planning for those little dots to be my guide when sewing out the graph paper grid. Once I got all done and sat down at the sewing machine I realized that was just not going to work. With a 2 year old climbing all over you as you are drawing out dots, accuracy drops. I ended up ignoring the dots I spent an hour drawing and just sewing using the presser foot as a guide. The dotty side became the back. :) This photo was taken Tuesday night.


The next step was to sketch/sew on the doodle! For this step I used a light grey thread. I wish I'd used a darker grey but no time to stop sewing and go to the store for darker thread. And here is what the quilt looked like with the doodle outline all sewn. (Taken Thursday night.) I doubled the size of the doodle on the grid too so it would be easier to see.


The grid and the outlining went pretty quickly. I had visions of uploading photos of my little quilt Friday evening, Saturday morning at the latest. WRONG!

To fill in all the outlines to mimic the shading I usually draw I decided I'd use colored thread and fill it in by straight stitching back and forth; close together for the darker shading and a bit farther apart for the lighter shade. I thought this would take a couple hours at most. So very wrong! I think it actually took about 10, mostly hours where I should have been sleeping! I worked from about 10pm - 2:30am the past two nights (but did the binding in there too) plus I got up early this morning to finish up. I'm exhausted but with the last two nights I was not about to miss today's submission deadline!

This is where I gave up Friday night.


I had all but the bright yellow and yellow-green done when I stopped last night (or dark-thirty this morning technically) but didn't think to take a photo.

I had originally planned an in-order rainbow arrangement, but since I didn't have a real orange I decided to shift everything a bit. Plus I'd rather have the focus be on the blues and greens.


It was such a relief this morning to get those final stitches in! And somehow I managed to finish just before I used up the 2nd full bobbin on grey thread!  I used all grey in the bobbin for the outlining and coloring, so the back looks like I just colored it in with a regular pencil. (If you ignore all those loose threads I haven't taken care of yet.)


Here's the final finished quilt! I really do like how it turned out and I think the binder clip hangers are an extra fun touch. :) I'll either paint those thumbtacks to match the wall or use something else to hang the clips.


And here's another close look! This time, from the side.


I hope you like my little quilt too! I'd love to have your vote this week over at Project Quilting! Vote on the upper left side and be sure to leave a comment on the Office Store Challenge post to have a chance at winning a prize too!

Sunday, July 11, 2010

Stars for Project Quilting!

I jumped in for another round of challenge fun at Project Quilting! The theme posted last Sunday was "Stars Over America" and (as I understood it) required the use of one color and as an option you could also add red, white and/or blue.

Here is the version of little mini quilt wall hanging as I submitted it to the challenge! It's named "Twinkle, Twinkle," after the kid's song. :)


I say "as I submitted" because I still intend to add one more element, but absolutely ran out of time! (I was doing the last bit of machine quilting just 5 minutes before the noon CST deadline today, so I hurriedly took a photo with my phone's camera and uploaded it to Flickr, then ran over to my computer to add it to the Project Quilting group. I'm still not sure if I managed to sneak in under the deadline. I hope so!

After my speed quilting this morning, I'm taking a little breather, but I intend to add on 5 little stuffed stars hanging from the bottom on the same blue yarn I used along the edge of the mini quilt. THEN it will go into my little guy's room. :) I'll be sure to share a final picture of it!

I chose all the fabric from the stack I still had sitting out! All but 1 piece of fabric here was also featured in the Windy Days quilt I have up for vote in the McCalls Quilt Design Star contest! (Are you voting every day still? RIGHT HERE! Thank you!) Can you pick out which is the new addition? :) (Hint -- it's not a blue!)


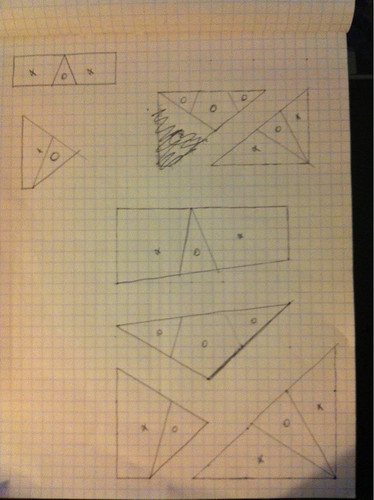
When I read the theme "Stars Over America" I knew I wanted to do some foundation pieced stars. I wanted to do stars years ago but then got distracted with other projects and never started, so this was my change! I decided to make this even more of a challenge for me and NOT let things be symmetrical and carefully measured. I drew the stars freehand on graph paper and then created foundation patterns based on those sketches. Here is a peek at a few of the star patterns. (I don't draw on the seam allowance, I just remember to leave excess all around the edges of each piece.)

Foundation piecing patterns

Each of the 7 stars is a little different! Here is a peek at all the finished stars before I tore all the paper off.


And here is the front view of all the finished stars! I grouped the 2 smallest stars together in one block and then "crazy-pieced" the stars into rectangles. (Late night photo w/ flash turned my tans bright yellow!)


I was inspired to use yarn along the edge of my project by Love Bug Studio's log cabin entry (she used a fuzzy fiber along the pin edges). My 1st chance to make it out to a shop to find some yarn was last night, about 15 minutes before the store closed! I couldn't find the perfect shade but then I remembered Kathleen of Kathleen Quilts mentioned tea dying one of her fabrics for this challenge, so even though I'd never done it before, I thought I'd give it a try! I left a long length of yarn in hot concentrated tea for about an hour and then dried it with towels and then a hot dry iron since I was in a rush to sew it on! (Another horrible late night, kitchen-lighting-photo of the yarn I bought and the tea-dyed yarn, but the difference is still clear!) Thanks for the inspiration ladies!

Experiments with tea!

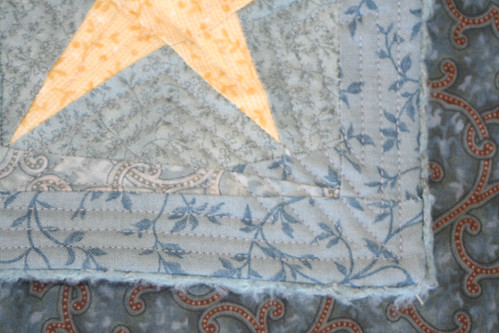
The last thing left to do this morning before the noon CST deadline was the machine quilting! I went freeform with this as well, another 1st! My only plan when I sat down at the sewing machine was to echo the stars and use a bluish-grey thread for quilting the blue fabrics and a light tan thread for quilting the stars. I ended up machine quilting lines approximately 1/4" apart, echoing the stars and using mostly parallel-to-the-edge quilting in the thin border. I underestimated how long it would take to quilt (just over an hour) and finished the last bit just 5 minutes before the deadline!

Here's a closeup of the bottom right corner so you can see the echo quilting and the couched fiber a bit better. (Ahhh ... natural light, so much better!)

Twinkle, Twinkle quilting closeup - front

And on the back you can clearly see the different color thread for the stars.

TwinkleTwinkle_quilting_closeup_back

Be sure to head over to Project Quilting and see all the amazing quilts created last week! Vote for your favorite on the left sidebar and then see how to enter into the public contest too!